Putting It All Together with Programming
- Christopher McKinney

- May 15, 2020
- 4 min read
Today, I decided to do this blog post outside because of how nice it was today. This blog post will be the last part of our circuit building series and will focus on programming the microcontroller that powered our LEDs (light emitting diodes). This programming language that we will be using is called C++ and is used for many other purposes besides programming microcontrollers. The software to write these programs can be found on Arduino's website, but I would recommend using their online editors for beginners which can be found at the following link: https://create.arduino.cc/editor
So what will we be programming exactly? We will be designing a button that turns on 3 LED's with a single button. While this can be achieved without programming, it is a great exercise for beginners and a fun way to learn the inputs and outputs of the Arduino Uno microcontroller. Here is a picture of what the circuit that we will program looks like:
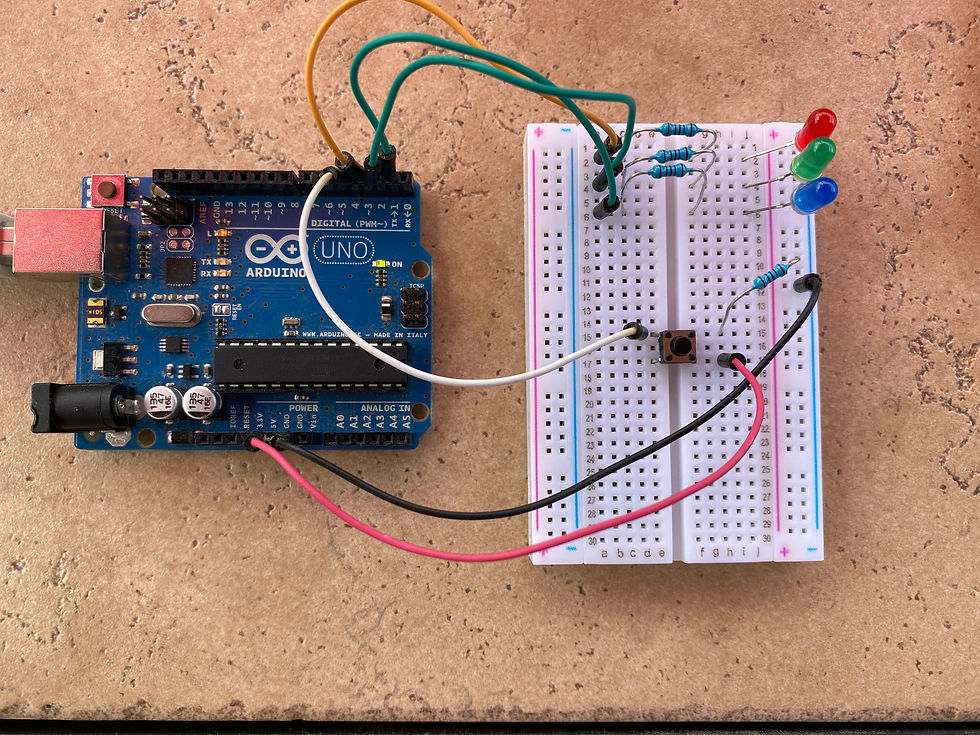
Once you have a circuit that looks like this and have the Arduino Uno plugged into your computer, you are ready to start programming!
The first thing that we want to do is define all of the constants in our programs. This is basically saying which each pin on the Arduino will do. As you can see above, the LEDs are plugged into pins 1-3 and the button is plugged into pin 4, this is shown in our code as the following. The variable is a changing value that we will use to determine whether or not the button is being pressed or not. A value of "1" is on and a value of "0" is off.
//Constants
const int buttonPin = 4;
const int led1 =  1;
const int led2 = 2;
const int led3 = 3;

//Variables
int buttonState = 0;
There are two functions that are needed two run a program on an Arduino Uno, those two functions are
void setup(){
}
void loop(){
}
Both functions do exactly what they sound like they do. The first function, setup, runs only once and the second function, loops, runs for the rest of the program. In this is where all of the code will be be written (except constants and variables, which come first).
The next thing to do is define whether each pin is an input or output. As you can see in the code below, the input pin is the button since it is providing input to the Arduino and the output pins are the LEDs since they produce an output. This is defined with the function "pinMode(pin, HIGH/LOW)".
  // initialize the LEDs pin as an output:
  pinMode(led1, OUTPUT);
  pinMode(led2, OUTPUT);
  pinMode(led3, OUTPUT);

  // initialize the pushbutton pin as an input:
  pinMode(buttonPin, INPUT);
(All of the code above goes into the void setup function since it is setting up the pins for the loop.
Finally we are at the loop function, this is where our program will constantly check if the button is being pressed down. This is done with "digitalRead(pin)" function. If the button is pressed, the variable "buttonState" will be equal to the value "1", if it is not pressed, it will be "0". This is done using the following line of code:
buttonState = digitalRead(buttonPin); //Reads the button stateWhen it is pressed down, the current will flow to "button" pin 4 and input a "HIGH" value. If the button is not pressed, then it will read a "LOW" value. The function "digitalWrite(pin, HIGH/LOW)" will then turn each led on and off depending on the button.
  if (buttonState == HIGH) {   //checks if the button is being pressed
    digitalWrite(led1, HIGH);  //turns each LED on
    digitalWrite(led2, HIGH);
    digitalWrite(led3, HIGH);
  } else {                     // if the button is not pressed...
    digitalWrite(led1, LOW);   // turn each LED off
    digitalWrite(led2, LOW);
    digitalWrite(led3, LOW);
  }
All of this code belongs in the loop function. I added some comments to this code on the right side to make it clear to those who may not understand it fully. These comments are marked by the two forward slashes.
That is it! Your program is finished! Now all you have to do is verify the program (with the verify button) and upload the program to the Arduino Uno. If everything is correct, you should be able to press the button down and have all of the LEDs light up.
I really wanted to finish this blog post series up with programming but wanted to let you all know that the next upcoming podcast will be featuring a good friend of mine that is very talented in computer programming and knowledgeable in cyber security. To go along with our hacker podcast theme, we will be discussing all the various types of methods that hackers use to break into digital systems. I will be talking to Patrick Mehlbaum about all these things and hopefully get some insight, as he is perusing the field of cyber security for a college degree and already has quite a bit of knowledge about the topic already. Keep your eyes out for this upcoming discussion if you want to hear our thoughts on hacking it today's day and age.


Comments